Foxes and Rabbit Simulation Unity 3D using C # Tutorial
2014-11-11
Monte Carlo method has been implemented in “lotka volterra predator prey model. I used this for Foxes and Rabbit Simulation in Unity 3D using C #.This is the step by step tutorial with full source code included. The initial parameter can be set from unity GUI. The initial parameters can be set up from the Main Camera (StartSimulation.cs is attached with this).If you are interested to see the analysis I performed for the result obtained I have attached the my report at the end of this project. This is a part of my assignment for the course Game Based Simulation in Høgskolen i Ålesund. I am very grateful to my teacher Siebe van Albada without whom I wont be able to complete this project. The model developed is not 100 % correct. There is a lot more to study more on this. Click here to see my simulation I haven’t implemented the actual model of predator prey. My Assumptions are for this model on which this simulation is performed is based on four cases. Case 1: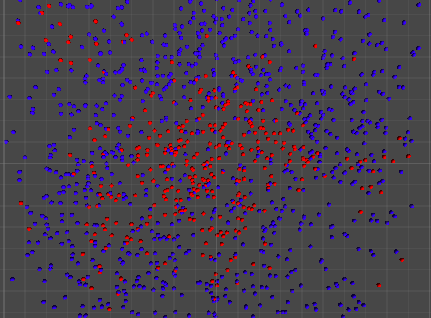 Fox —-k1——-> Ø Where K1 is the fox death rate In this case, fox will die after a certain life span. Case 2: Fox ——–k2———-> 2 Foxes K2 is the fox birth rate Fox can breed new fox in the rate of K2. Case 3: Fox + Rabbit……..k3………………> 2 Foxes Where K3 is escaping rate of Rabbit from fox It is assumed that if fox meets rabbit with K3 it will breed one new fox. Case 4: Rabbit ………….k4………….>2 Rabbits K4 is the birth rate of rabbit. It is assumed that a new rabbit will be produced at this rate. It is assumed that a new rabbit will be produced at this rate.
1 3D Model
The predator prey model for simulation in Unity3D is conducted using a couple of sphere and a plane. The screen dump of the 3D model is shown in Figure .Red sphere represent fox and blue fox represent rabbit. The prefab used in this simulation are fox_prefab for foxes and rabbit_pref for rabbit.
1.1 fox_prefab Properties
The size of the fox_prefab is (20, 20, 20) .Sphere collider physics properties with trigger (enabled by default) has been added to this object. The position and rotation are not important for this simulation. Material is added to this sphere to change the default color into red. fox.cs script is attached for simulation. “fox” tag was defined for this object.
1.2 rabbit_pref Properties
The size of the fox_prefab is (20, 20, 20) .Sphere collider physics properties with trigger (enabled by default) has been added to this prefab. In addition, rigid body physics properties were also added which is required for collision detection. The position and rotation is not important for this simulation. Material is added to this sphere to change the default color into red. In order to simulate two scripts rabbit.cs and. “rabbit” tag was defined for this game object.
2 Scripting
There are four scripts for this simulation is discussed in this section.
2.1 startSimulation.cs
This is the starting script. The initial number of foxes and rabbit are controlled from this script. In addition, the area of simulation (plane size) or field can be varied. Instantiate function was used to clone the game object.
2.2 fox.cs
This script is responsible for the behavior and activities of foxes. The script starts adjusting the area of simulation by importing the object “planesize” from startSimulation.cs. The next block of code is for transforming the position of foxes. This block will let foxes move around the field with random position in x and z-axis. The random value is generated from random.value (generates between 0-1) and some step size was used. If statement helps us to shift the position of fox and rabbit to put into the boundary. For example, the range of field size runs from -360 to +360 in x-axis. If the fox have new position greater than +360 then the new position will be -360.This is called periodic condition. The probability for the death and birth of fox is included in this script. The defined parameter looks like double Pfoxdeath_rate = (24f*60f*60f /(foxdeath_year * 365f * 24f * 60f * 60f)); double Pfoxbirth_rate = (24f*60f*60f/(foxbirth_indays * 24f * 60f * 60f)); The numbers of foxes are controlled from these two probabilities by generating random value. If the generated random number is less than probability of fox death then game object fox will be destroyed. If the random number is less than probability of fox birth then new game object fox was instantiated. Moreover, the rate at which rabbit can escape is also defined. This logic in scripting was used as collision detection between the two spheres. Both spheres should have sphere collider physics properties as mentioned in above section. OnTriggerEnter function was used for this purpose as shown below. void OnTriggerEnter (Collider col) { if(col.gameObject.tag == “rabbit” && Random.value < escapeRate) Destroy(col.gameObject); Instantiate (fox_prefab, transform.position, Quaternion.identity); } The parameters for calculating probability can be easily assigned from Unity3D GUI. Lastly, counter was added to count the current number of fox. The numbers of foxes counted were save into the text file for simulation. The function used for writing into the file was streamwriter. This script is attached to the object “fox_prefab”.
2.3 rabbit.cs
This script is responsible for the behavior and activities of rabbit. The properties for the field were imported from startSimulation.cs. The movement activities are similar to the fox script. The probability of death and birth is assigned different for the rabbit but the logic is same as in fox script. In addition, the destroying the game object of rabbit and instantiate new rabbit is works in similar logic to the fox script. The whole script can be found in Unity Package file uploaded in Fronter. This script is attached to the object “rabbit_pref”.
2.4 countfox.cs
This script is responsible for counting the current number of foxes and rabbit on the field. The function used for this purpose is OnTriggerEnter(Collider other). This countfox class was imported to the fox.cs script. The number of rabbits were counted with the help of Game object tag. I have built the whole unity Project and available you for download. Click here to download Full Report including the analysis of the result obtained. If you are intereste you can check my Galton Board Simulation in previous post. Feel Free to drop my comments!