Galton Board Unity 3D Tutorial for Beginners with C# Script (Step by Step)
2014-10-23
The Galton Board is also called as quincunx or bean machine. This device is used to perform statistical experiments. This is very useful for simulation probability distributions (binomial). I am going to teach you how to build Galton Board and simulate using Unity 3D. This is part of my assignment for the subject simulation and visualization and found very interesting to share here. The theory is easily available in the internet so I am not going to include any theory.
The processes carried out for making the Galton are discussed in this section.
The final project can be accessed from http://goo.gl/goJbfI 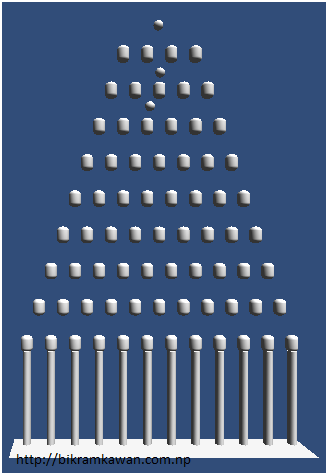 Section 1: 3D Modeling The first step was to prepare 3 D model for the board. The complete 3D model of board is shown in Figure . Ball: Sphere was used to create the 3D model for the ball. The dimension of ball is (0.8,0.8,0.8). The instantiate property of Unity was used to create the duplicate balls, which is discussed in section 2.2. Board Pins: ** Capsule was used to make board pins. The dimension of each board pins is (1,0.7,1). The instantiate property of Unity was used to create the duplicate balls which is discussed in section 2.2. *Wall: * Cylinder was used to make the wall as shown in Figure. The dimension of each wall is (0.71, 3.85, 1). The instantiate property of Unity was used to create the duplicate balls which is discussed in section 2.2. *Surface: * Plane was used to make surface at the bottom where ball hits. There are each plane in between every wall for which instantiate property of Unity was implemented, which is further described in section 2.2. All the 3D models created in work space were saved as prefab. Section 2: Scripting The scripting technique used to make work Galton board is discussed in this section. The full source code is attached in the Appendix . **Board Pins: The 3D Model builds were duplicated using the instantiate function of Unity. The board pins were structured in the pyramid style using for loop. The block of code used to instantiate as shown in Figure is included below. for(float i = 0; i < height; i++) { for(float j = 0; j < width; j++) { clone = (GameObject)Instantiate(pinsprefab); clone.transform.position = new Vector3((xspacing*2f*j)+xpos, 3*i, 10.0f); } } Height defines the number of rows equals to 10. Width defines the number of column equals to 13. xpos= Offset fixed to 20.5. xspacing = The distance between the objects which is fixed to 1. Hence, Board pins will be instantiate every time transformed to new position defined as new Vector3. Ball: The source that handles the function of ball is included below. The ball is instantiated in every 1 sec. The time interval was calculated using Time.time function. timeofLastSphere gives the time when the sphere was created. timeSinceLastSphere was used to calculate the time elapsed 1 sec. The position of creating continuous ball is at the middle of the board. The random function was used to prevent the ball stack on them. timeSinceLastSphere = Time.time - timeofLastSphere; _ if(timeSinceLastSphere > 1.0f){_ _ GameObject cloneSphere;_ _ cloneSphere= (GameObject)Instantiate(Sphere);_ cloneSphere.transform.position = new Vector3((xspacing*2f*(width/2f-0.5f))+xpos + Random.Range(-0.1f, 0.1f), 3.0f*height, 10.0f); _ timeofLastSphere = Time.time;_ _ }_ Wall: Cylinder was instantiated to create the wall which is equal to the column of the Galton board. The source code is included below. for(float k = 0; k < width-1f; k++){ clonecylinder= (GameObject)Instantiate(cylinder); _ clonecylinder.transform.position = new Vector3((xspacing*2f*k)+xpos+1.0f, -1.46f, 10.0f);_ } The number of cylinders was equal to width -1 only at the bottom of the board. If statement was used to create only at the bottom of the board (first row). The if statement can be found in the full source code attached in appendix. The y and z distance were fixed manually. Surface: The source code used to create surface is included below. cloneplane= (GameObject)Instantiate(plane); cloneplane.transform.position = new Vector3((xspacing*2f*k)+xpos+1.0f, -5.71f, 10.0f); The plane was instantiate similarly as for wall. Counter: Counter was implemented to count balls on each plane. The aim of counting the ball is to plot the distribution. The source code is included below. public int count=0; _ _ void OnTriggerEnter(Collider other) { _ Destroy (other.gameObject);_ _ count++;_ _ }_ It counts the ball when it strikes the plane. Therefore, there are 12 counters for 12 planes.